Tuesday, 31 July 2012
the shining nails, family guy nails, hello kitty nails, monster energy nails, true blood nails, spongebob nails, wizard of oz nails, cookie monster nails, lady gaga nails, rainbow brite nails, zombie nails, uzimaki junji nails, monster high nails, frankie stein nails, tangled nails, winnie the pooh nails, click playlist for 55 different characters to learn and enjoy please spread the word. robinmosesnailart,
78 tutorials, diva nails, glitz nails, glamour nails, long nails, divalicious, super long nail, how to paint long nails, painting long nails, how to long nail, long nails, rhinestone nails, jeweled nails, glamourous nails, glitzy nails, sparkley nails, nail charms, sexy nails, stripper nails, sexy nails, filthy nails, beast nails, divalicious nails, eleganza extravaganza, robinmosesnailart,
Monday, 30 July 2012
purple ombre nails, ombre bling, blue and silver nails, conversation nails, diva nails, easy nail art, robin moses, beginner nail art, simple nail art, fun nail art, jessie bernstein, gonzo nails, fnord, beautiful nail art, nail art gallery, pictures of nails, huge nail gallery, nail gallery, pia zadora, crazy nails, nails for teens, valentino nails, designer nails, Valentino Clemente Ludovico Garavani, nails 2012


Sunday, 29 July 2012
wedding nails, indian wedding nails, monet nails, henna nails, june bride nails, bridesmaid nails, special event nails, diva nails, beautiful nails, nail art gallery, how to paint nails, mother of the bride nails, ideas for nails, nail pics, bridesmaid nail art, gorgeous nails, classy nails, chic nails, feminine nails, robin moses, nail art,
click next to take you to the next video on this playlist! there are 55 on this post!
Cute Stuff ♥
Hi guys! This is not a nail art related post, just like to share some cute stuff that I bought last friday together with my hubby. Aside from nail art I also like to collect cute things, and I also love cooking.

bear lens case and a pooh mini padlock
chocolate lens case

hello kitty face watch

hello kitty blouse

hello kitty candy bracelet

card holder that can be use as nail art plate holder

various mold for desserts
you can use them for baking and food decorating.
i bought some mold for rice chocolate and ice! i love them all!


Hope you like them!! God Bless
Saturday, 28 July 2012
Tutorial: Studded V-gap

Hi everyone, it's time for a new tutorial! :-) This time I'll show you how to make the studded V-gaps I used in my third day of the 31 Day Challenge. What I like about this design, is that it goes well with both subtle and bold shades, adding an edgy element. It's not the quickest look to make though, so I recommend using it on an accent nail (or two) or for a special occasion. Let's get started!

Start with the cutting of your tape strips, you'll need two for each nail you'll decorate. The way I cut the strips is by taking off a small piece off the roll which I cut in thinner strips lengthwise.
(For this tutorial I'm using colored tape because it's more visible, though I usually use regular stationery tape. It's more flexible than painters tape for example, plus the translucency is an advantage with certain designs.)

Then apply your basecolor. This can be anything as long as it doesn't distract from the studded V-gap. So make sure your basecolor isn't too dark or has a too striking finish if you want the black of the design to really pop.
Let the basecolor dry and use a fastdrying topcoat if needed. (I like to use Seche Vite.)

Now place the tape strips one by one on the nail, forming a V-shaped hole at the cuticles. Let the top ends of the strips start on the nail just below the cuticles, rather than overlapping them. This way you'll prevent polish from seeping under.
When the strips are in the right position, press them down firmly so that they stay put.

Then apply a black creme polish over the V-gap you created and remove the tape strips as soon as possible (so when it's still wet), this will create crisper lines.
Clean up excess polish on the skin in case needed.

Finally add your 'studs' along the edge of the V-gap with a dotting tool and a silver polish. Begin with the dot in the middle, to make even spreading of the dots easier. Once the design is dry, finish with a topcoat and your edgy look is done!
Finally some useful tips:
- For my tape manis, all I use is regular stationery tape. But you might prefer something else, so just experiment with different sorts of tape to figure out what works best for you.
- For your base color you can use any polish you like, however one-coaters will allow you to place the tape much sooner because those are usually fast drying. Of course you can also quicken the drying of polishes that require several coats to cover, by applying a fast drying topcoat. (I use Seche Vite).
- Your layering color(s) can be either a one- or two-coater. Because you've already applied a base color, most polishes that usually take two coats to cover now will do with one.
- You might want to leave the cut strips somewhere else than the edge of your desk/table, to prevent them from getting stuck to the surface while you're busy. You do not want to have to peel them off with your freshly painted claws!
- Apply your layering color in one thin (but opaque) coat, this will create crisper lines.
- When you're removing the tape strips, try to remove them individually, if you can, because most of the time your design will come out neater this way
- Using tweezers to remove the tape strips can prevent your freshly painted nails from getting smudged.
- It's not always necessary to start all over if you've messed up your design, often a little touch-up with a nailart brush can solve the problem.
- If you want to use a matt topcoat, use a regular one underneath. My experience with matt topcoats is that they smudge the design very easily, even when it's completely dry. Applying a normal topcoat first will prevent that.
- Moisterize your skin afterwards, because the tape can really dry it out!
- You can practice this tutorial on your old mani that you applied a day (or more) before. That way it's certain that the base color is dry.
- Have fun and practice makes perfect ;)
I would absolutely love to see your attempt on my design, so feel free to leave a link to your creation in the comment section!
Polishes I used in this post are KOH Mediterranean Sea, Color Club Where's The Soiree? and Essence Romeo.
Friday, 27 July 2012
DIVALICIOUS, eleganza extravaganza, juicylicious, long nails, sexy long nails, nail art for long nails, diva nails, chic nails, filthy nails, beast nails, best nail artist, nail art gallery, nail pics, how to nail art, nail art how to, nail art tutorial, nails, nail art, nailart, nailzart, art for nails, steven jo nail art, ghetto fabulous nails, club nails, stripper nails, party girl nails,
31 Day Challenge, day 3: Yellow


Yellow nails! These took a long time to get done because of the design on my ringfinger, so I made studded V-gaps on the rest on my fingers, which I actually liked better in the end. :-) The yellow basecolor is H&M's Lemon Tree. This was three to four coats which I admit is a lot. But the formula is great to work with, very smooth and no dragging, making it my favorite yellow next to Color Club Almost Famous. The silver I used for the dots/studs is Essence Romeo and the black is Color Club Where's The Soiree? as usual. What are your thoughts on this yellow rock look?
neon nails, summer neon nails, glitz nails, glam nails, psychedelic nails, psychedelic daisies, sun goddess, sun goddess nails, neon yellow nails, neon rainbow nails, robin moses nail art, robin moses, summer 2012 trends, nail trends, vogue nail trends, nail style, claires neon polish, funky neon nail, katy perry nail, nicki minaj nail, disco nails, freakadelic,


Wednesday, 25 July 2012
day of the dead pacman nail, pac man nails, matte red nails, matte red and gold nails, indian wedding nails, saree gold and red design, retro pacman nails, pacman sugar skull nails, sugar skull nail, day of the dead nail, red and gold nail, matte nail art, video game nails, nerd nails, geek nails, indie nails, nail art gallery, robin moses nail art,


Monday, 23 July 2012
robin moses nail art, operation repo nails,beverly hills pizarros, lyndah pizarro nails, sonia pizarro nails, pink pizza nails, pink and black nails, pink skull nails, trutv nails, pizza nails, fire nails, tire track nails, dark gothic nails, zombie nails, nails dripping blood, zombie nails, gothic nails, celebrity nail art,
lyndah pizarro approached me to do a 'operation repo' themed design and i had to say yes. i am a huge fan of the show and being born in las vegas, operation repo is filmed not far from my home town in los angeles. many of the streets shot have been streets i have been on so nostalgia mixes with the hilarious and operation is and remains a guilty pleasure to watch. the hardest thing about this design was sonia. sonia changes her look a lot. i went to her facebook and found a picture (at lyndahs suggestion) and found the perfect one. after i finally found THE sonia, i went right to work. the whole design took a LOT of hours. it was 6 to prep and have them finished....but i had to go back and finish lyndah the next day. i am a perfectionist. those of you who are perfectionists will see lyndahs photo of the herself a bit different than my end photo of lyndah :D i didnt reshoot end result pics. so i am glad lyndah caught the real look of the final pics. anyway, i thought i would talk a bit about it. i will add lyndahs "unboxing" to this as soon as she makes it visible for the audience and i hope you enjoy the video :D
here are the photos i used


and here is the finished project
 well.....almost finished. i worked a bit more after this shot, anyways.....when they were done, i sent them to lyndah like this

here are the photos i used


and here is the finished project


Sunday, 22 July 2012
31 Day Challenge, day 2: Orange


Day 2 of the 31 Day Challenge! This time the challenge was to do orange nails and it was truly a challenge. I had a hard time coming up with something with orange as the main color instead of an accent color. Finally I decided to go with trusty clouds (tutorial here) combined with two shades of green, as I find orange to combine best with certain greens or blues. The lovely pastel orange is H&M's Peach Me Soon, in the middle you see Orly Ancient Jade and I've got Essence Bella on the tips. I look forward to my next challenge: yellow nails! See you soon. :-)
Friday, 20 July 2012
31 Day Challenge, day 1: Red


That's right! I'm finally doing the 31 Day Challange! The task for day 1 is to make red nails and this is my attempt. Okay, so it's just as much grey as it is red. :-P But I decided to allow myself to have a little bit of freedom with this challenge, hope that's okay! ;-) For this simple fifty-fifty tape mani I started with a sexy red basecolor, #85 from Hema (a Dutch department store). When that had dried, I covered half of each nail with tape and painted the other half with a thin layer of China Glaze Concrete Catwalk and Tinsel Town. After removing the tape again, this is the end result; vampy and sparkly, can't say no to that! ^^
Because I'd like to enjoy the results of each challenge for more than just a day, I'm going to have to cheat a tiny bit with the original schedule of a challenge a day. As a compromise I promise to work twice as hard on each little project. ;-) Thank you for reading!
Wednesday, 18 July 2012
robin moses, blue flower nail, blue bouquet nail, blue ombre nail, flower bouquet nail, antique nail, blue antique nail, floral nail tutorial, border/outline nail, border nail, outline nail, colorful border nail, bright outline nail, red hat lady nail, nail art gallery, nail pics, how to nail art, how to paint flowers, how to paint nail outline, bling bling nails, diva nails, simply colorful nail,


Monday, 16 July 2012

robin moses, school nails, back to school nails, graduation nails, class reunion nails, party nails, balloon nails, book nails, the class of sation, teacher nails, red and blue nails, class ring nail art, how to paint letters on nails, how to paint words on nails, paint words on nails, cap and gown nails, diploma nails, year book nails,


Friday, 13 July 2012
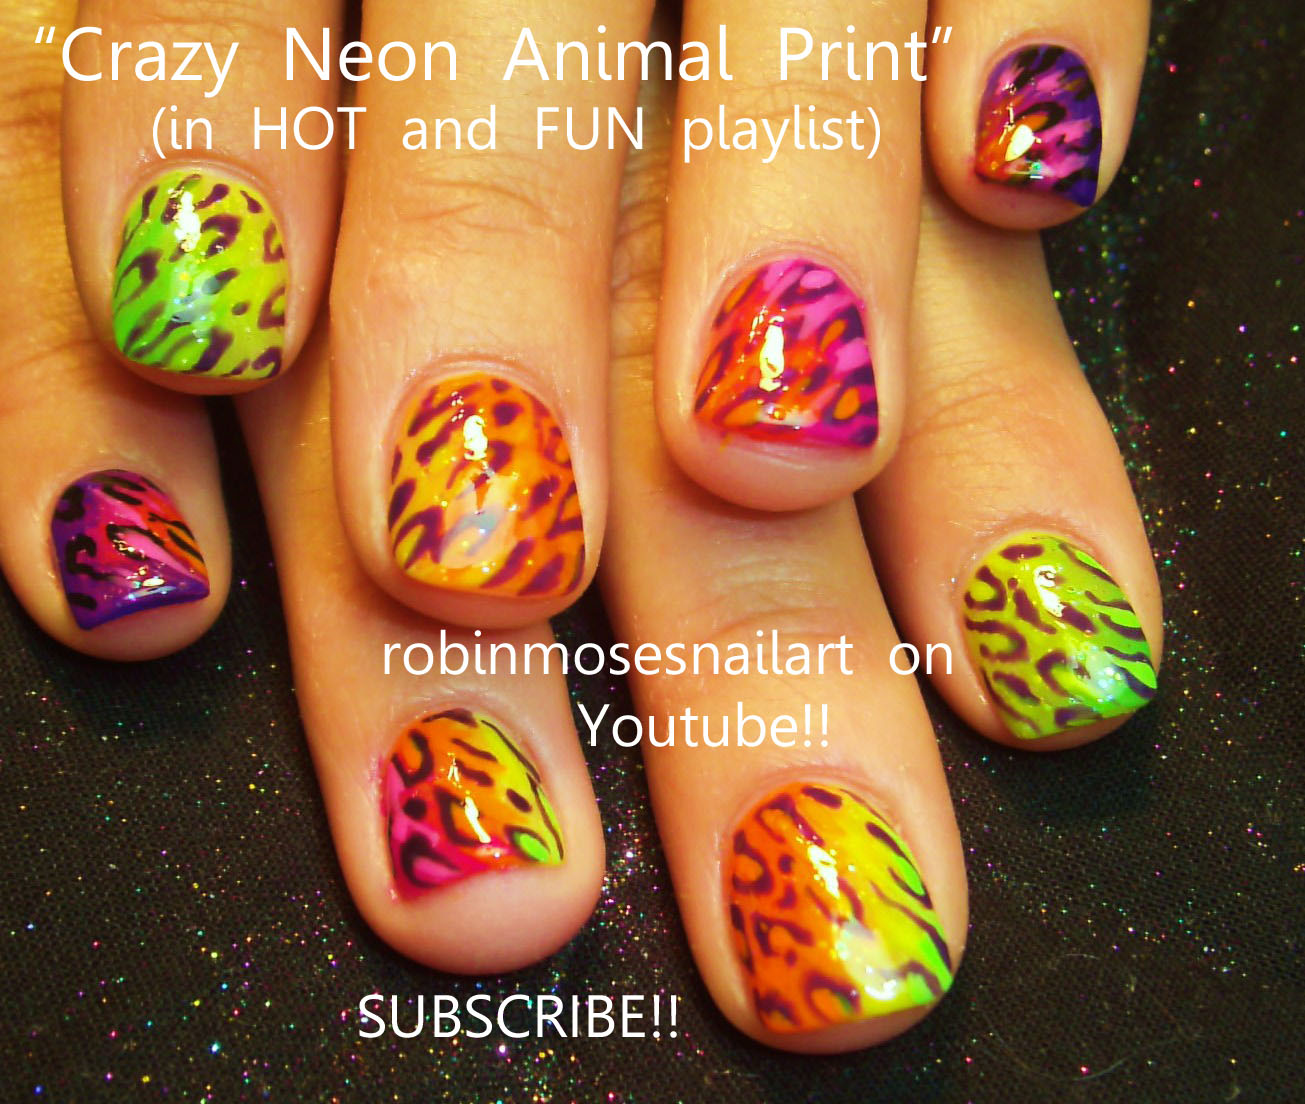
crazy neon animal print nail, neon animal print nail, neon leopard nail, neon summer nail, glow summer nail, no water marbling nail, no water marble nail, marble with dots nail, teal and purple nail, teal and lavender nail, rainbow nail, short rainbow nail, natural rainbow nail, party nails, club nails, rave nails, raver nails, glowing nails, short nail art, dubstep nail, pretty lights nail, digital nail,

Wednesday, 11 July 2012
Divergence


Hello lovely readers! For this post I have this colorful divergence mani to show you. In the pictures I'm holding China Glaze Life Preserver, a dusty orange creme. Orange is probably my least favorite color when it comes to nail polish (next to browns), but I actually really like Life Preserver in this mani! It adds that bit of warmth to the whole. The other polishes you see in this tape mani are Diamond Cosmetics Don't Teal My Heart Away (absolutely smitten with this polish ♥) and China Glaze 2030, the gold chrome. Thank you for reading! :-)


Clip-on Hair Extensions Review / Tutorial
Hi guys! I just received another product from Bornpretty! I'm excited to make a tutorial for it, and I think this is one of my favorite! A 22" clip on hair extension.
The package includes the following: click picture to zoom-in

clip detail

close-up view


Here's how to use them:
- Start out with dry straight hair and have your extensions ready.
- Raise your hair up. Take about an inch of your hair starting from your hairline.
- Unclip the hair extension.
- Snap it on your hair. Continue until you reach the top half of your head.
- Part hair on the side, and clip in the very small welfs. The ones that only have 1 clip. Repeat on the other side.

TADA!!!
Style as desired!! Surprise your friend with your new look!!!

finished product

My personal opinion about bornpretty hair clip extension.
* stylish long hair extension that looks natural. *very fashionable.
*this hair extension is a perfect choice to give your hair an instant additional length.
*smooth and straight
*blends with your natural hair.
*easy to use.
Hope you like it! God bless

NOTE: This product was sent to me as a gift. I made this review based on my own ideas and preference on how to use them. My opinions about the quality of the said products are based on my personal judgements and the outcome of my usage.
Subscribe to:
Posts (Atom)