Friday 30 September 2011

V-gap and OPI Gold Shatter


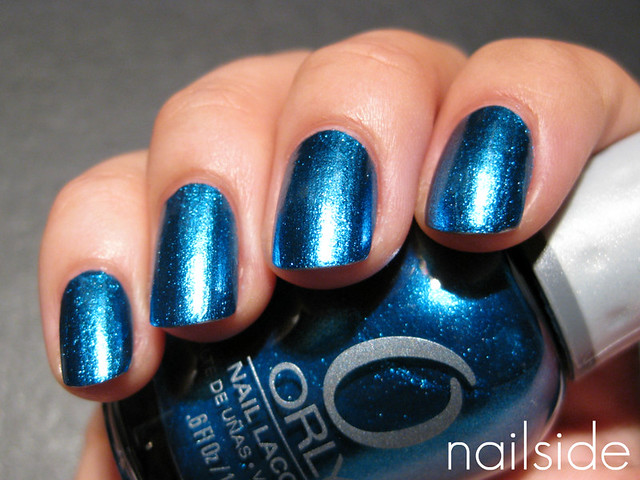
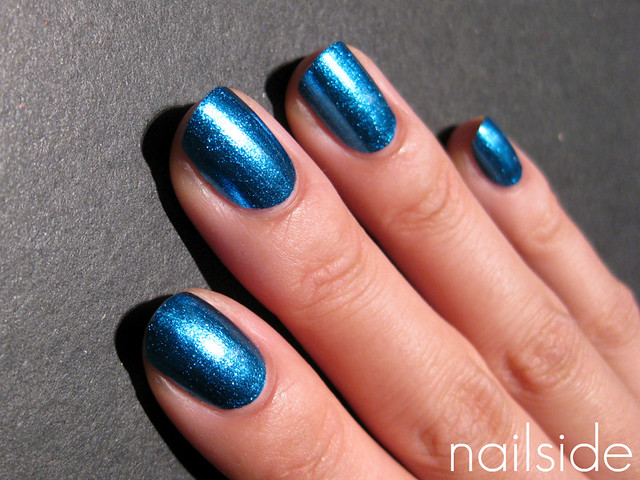
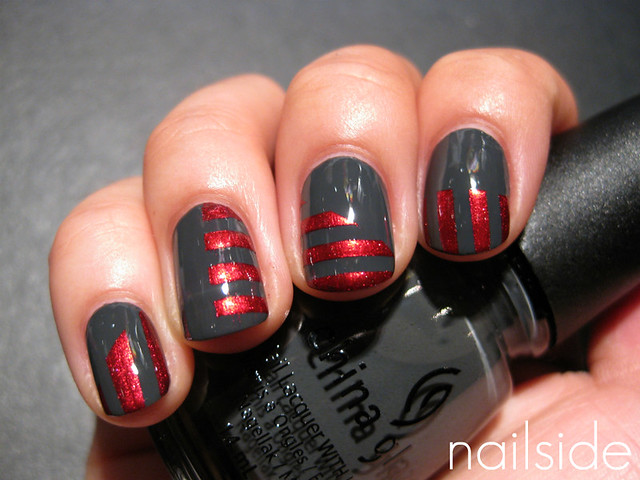
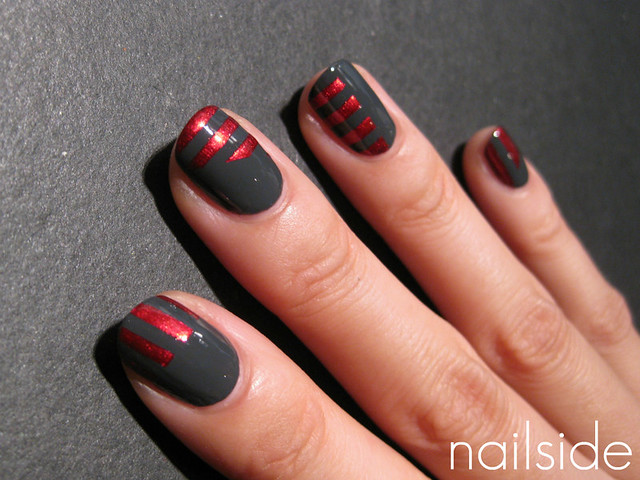
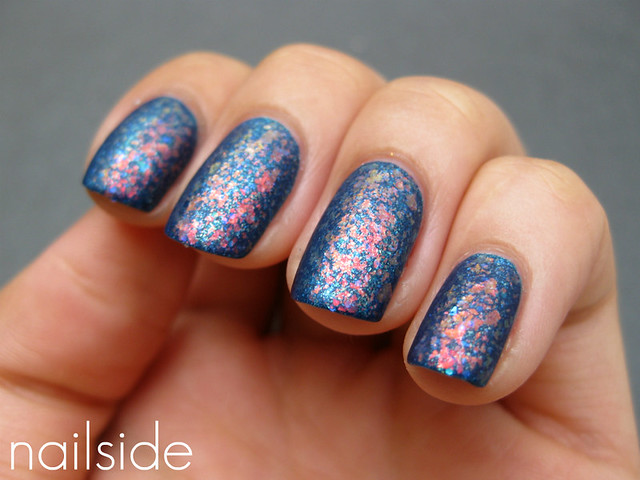
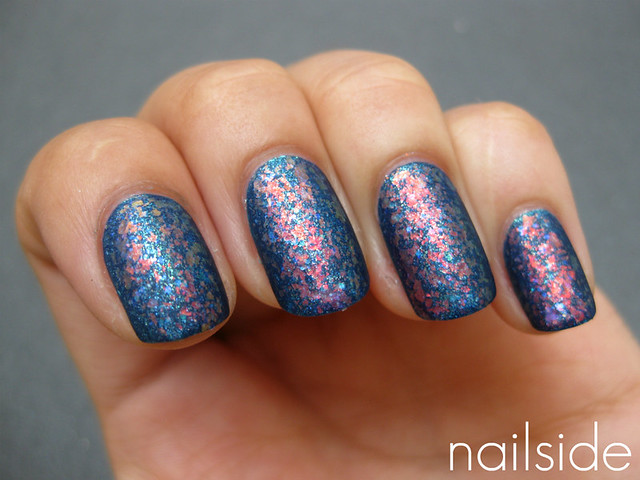
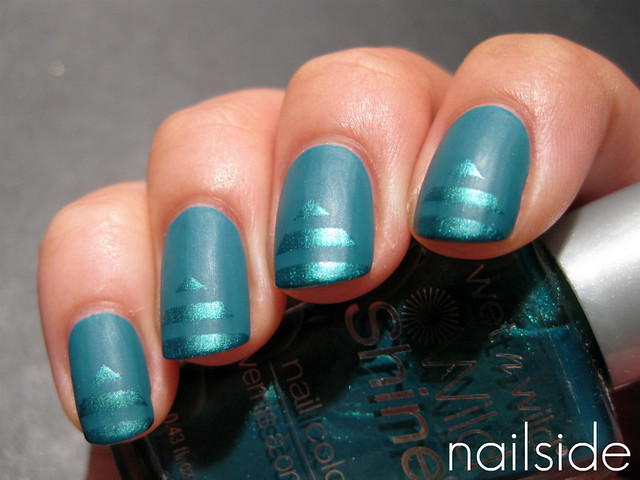
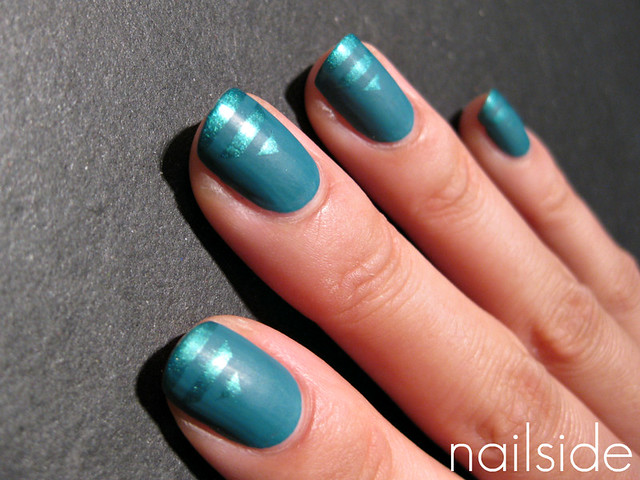
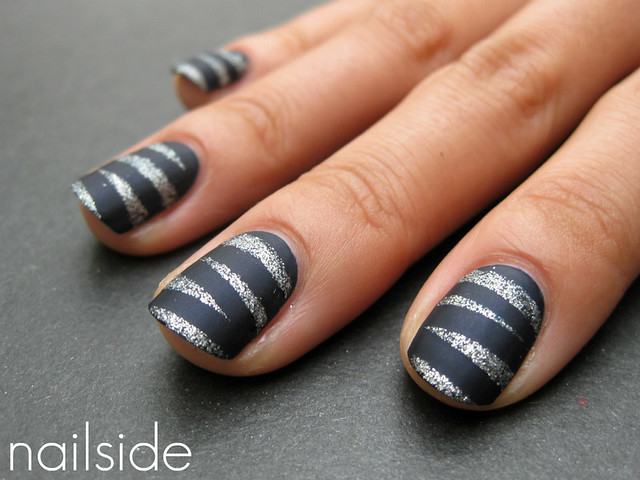
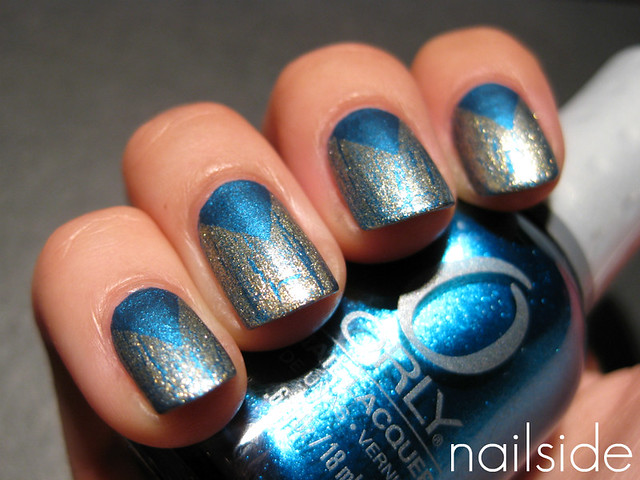
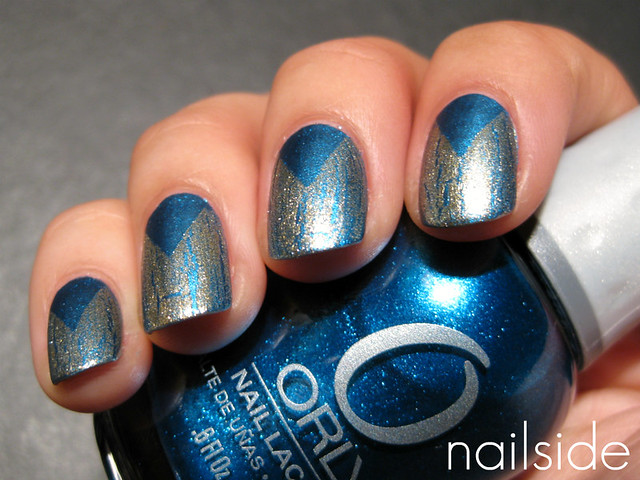
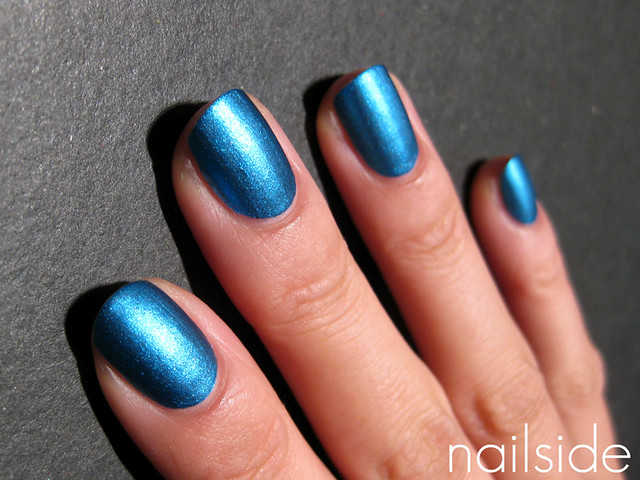
Hi guys! Yesterday I showed you my post with Orly Sweet Peacock, today I have the V-gap I made with it. First I mattified it with Essence Matt topcoat, which made it look stunning. Sweet Peacock is so sparkly that even with a soft, matte finish it still sparks like a gem. For the V-gap I placed triangles to cover up the blue and I applied OPI Gold Shatter on top. Gold Shatter is another new polish that arrived in my mailbox this week and I couldn't wait to try it out. Though blue and gold is always a win in my book, I'm not exactly crazy about this look. I like the colors but maybe there's just too much going on. Oh well, next time better :) What's your opinion?

indian wedding nails, fall wedding, fall designs, fall nail art, nail art design, nail art designs, autumn nail ideas, fall nail ideas, holiday party nails, fall nails 2011


i share new designs every monday, wednesday and friday. please subscribe and fan and spread the word. please also make sure those copying my work have "inspired by robin moses" somewhere on the design as that is all i ask in return for all i teach. my frequently asked questions are called FAQ'S in links on the left hand side of my youtube front page. there are tons of answers and tips  and tricks. my love and thanks for all who help and support me.


Thursday 29 September 2011

Orly - Sweet Peacock


Hello everyone, this blue beauty you're looking at is Orly's Sweet Peacock from the Birds of a Feather collection. The moment I saw the promo pictures, I knew I needed this baby in my life. It's blue and a foil, can't say no to that ;-) It's just as pretty as I'd expected... A gorgeous, electrifying, shimmery, medium blue. It only needs two coats for full opacity, but it does dry a bit gritty, so I'd recommend using a fast drying topcoat, also to speed up the drying.
Besides Sweet Peacock I also bought Lucky Duck from the same collection. I haven't swatched it yet, but it looks really good based on the bottle, so I'm sure it won't be long till it appears here :) Which polish(es) did you get from the Birds of a Feather collection?

Monday 26 September 2011

Stripey accents


Hello everyone :) I hope you guys had a nice weekend like I did, we had some late summer weather the last couple of days and I enjoyed it very much.
For this post I have stripey accents to share with you. I'm wearing one of my latest purchases, China Glaze Concrete Catwalk. I love the dark shade of grey and the polish applies like butter, just two smooth coats and you're done. Tonight I added the red, stripey accents, using tape and P2's Fever, I love this polish too! It's a deep, shimmery red, very glamorous and I love how it pops against Concrete Catwalk. Thanks for stopping by and have a great night!

nail art how to, halloween nail, designs nail, design for halloween, cat nail, bat nail, black and orange nail, the shining nails, the overlook hotel nail, the shining hotel nail, the shining movie nail, nails art, the shining twins nail, the shining movie sisters


Sunday 25 September 2011

Something Special

Hi guys,
I removed my recent acrylic nails... I'm so inlove and I really like my new nail extension which came from bornpretty. I received a lot of compliments when they saw it.. It perfecly curved in C shape. Thank you very much bornpretty store! If you like to buy nail art stuffs you can visit their site by clicking HERE. 
You can buy this nail tip for only $4.95 you will also get 10% percent discount just by typing the code MAEJ61..

indoor shot
outdoor shot


P.S

I want to thank my husband who's always there for me.. He supported me in everything and even with my hobbies. I have always been fascinited with photography.. Guess what..
he gave me a Nikon D3100 DSLR camera as a special gift.. I really like it.. thanks bhabhe and I love you very much! :)
Some of my shots.. ☺
cold water
sunset
Our vintage NIKON L135 AF 1984 camera,
originally owned by Steven Seagal (given to my husband's cousin by steven seagal way back 80's still functioning. =)
Jamir holding
Our vintage NIKON L135 AF 1984 camera.

Friday 23 September 2011

fall nail, autumn nail, retro fall nail, geometic nail, fall floral nail, fall flower nail, fall color nail, robinmosesnailart, robin moses fall nail, nail art for fall, fall nail designs,

fall floral poppies poppy field nail art tutorial HERE! CLICK ME
fall retro geometric autumn design with foil
my thanks for all of the hundreds of notes and messages supporting me :) my love to you guys! thank you also to all of my subscribers and people helping me get my name out. it is so so awesome of you guys. thank you so much :D

love to you!!!
robin

Outer Space Marble - A layering experiment


Hi guys! Today I'd like to show you a layering experiment I did a little while ago. I started with China Glaze First Mate, on top went Milani Cyberspace from the 3D Holographic collection, OPI Last Friday Night, Golden Rose #10 aaand... *gasp* ...matte topcoat. That's a mouthful. I really love the endresult, it looks like some kind of marble from outer space hahah. Quite interesting. Surprsingly Last Friday Night, which usually turns any polish into magic, was a bit unnecessary this time as it was hardly visible on top of Cyberspace. Golden Rose #10 on the other hand is just mind-blowing gorgeous! Pretty red flakies. In the bottle you can see them shifting from red to gold, to green and blue. But even after a zillion shots I wasn't able to capture the complete rainbow. A shame, because it's so pretty in real life!
I used many polishes to achieve this look, but surprisingly everything dried pretty well, because I only used one coat of each. And as I said, Last Friday Night could be left out the next time I do this. Have a great weekend everyone :)

Wednesday 21 September 2011

Turquoise pyramids


Hello everyone! How are you? I hope fine :) I'm alright, but something terrible did happen today! Somehow one nail of my left hand got teared a bit this week. I've been really good and didn't touch it for days but I guess the stress had taken over today, because I kept picking on it and now I've got a little nub there. Boohoo! So I made the rest of my nails shorter too to make it less noticeable. And so I won't be taken any pictures for a little while, because I don't like my nails this short :( But lucklily I still have a few manis from the vault for you. And today's post is one of them.
My basecolor is P2's Groovy. What a wonderful polish! I don't own many P2 polishes but my mom bought me some bottles a few weeks ago. I really loved the elegant shape of the bottles and I love them even more now when I found out how perfect Groovy was. It's a muted shade of teal, with a perfect creme formula and you can get away with one coat of it. Lovely! The next day I decided to add the 'pyramid' design, like I used in the 'military chic' mani. I used Wet 'n Wild Carribean Frost for it, which gave a subtle ton-sure-ton effect, I really like that shimmery teal polish :) And as my finishing touch I mattified the look with the sadly discontinued Essence Matt topcoat. Maybe I'll give China Glaze's Matte Magic a try when I'm through my back-ups. Anyway, enough rambling for today! ;) Have a great night!

ZOMBIE nail, halloween nail art, black nail art, junji ito nail, manga nail, anime nail, robin moses nail art, little mermaid nail, twisted disney princesses nail, uzumaki nail, disney nail, horror nail, evil mermaid, nail art,

zombies junji ito uzumaki nail art tutorial here
zombie little mermaid twisted disney princesses tutorial

the mermaid tutorial is one of my first....she just didnt belong anywhere until today. sorry so long, i might edit it (not) . it baffles me as to what everyone wants to see.....it is TRULY baffling.

Monday 19 September 2011

ray william johnson nails, equals three nail, =3 nail, your favorite martian nail art, comment section below hand, nail art portrait, robin moses ray william johnson nail art, benatar guitar nail, TJ the dee jay nail, puff puff humbert nail,


Mummy time


Oooh, it's time for the mummy design again :) Haven't done that one in a while! This time I was going for something chic and festive. As my base color I'm wearing OPI Russian Navy and on top of it I used China Glaze Silver Lining for the mummy design. Normally I wouldn't suggest using a glitter as a layering polish for tape manis, because most of the time they don't cover very well, but it all just depends on the density of the glitters. And Silver Lining has very dense glitter so not a problem for tape designs. It did leave me a gritty and uneven surface so to smooth it all I applied Essence Matt topcoat. Can't resist mattified glitter! Thanks for watching :)

Friday 16 September 2011

Tutorial: Citrus design


Hi everyone, welcome to my citrus design tutorial :) I first made this design for my entry in the Good Enough To Eat contest at Nail Polish Art Addiction, a few months ago. The shape of a sliced citrus fruit has always amazed me for some reason, so for the contest I made this exotic, abstract pattern. A few of you dear readers requested a tutorial for it, so here it finally is :) Now go pick three delicious, summery polishes, your nail art brushes and do some nail art!


Start with the base color you like (if necessary with a basecoat underneath) and let it dry.
Then use your nail art brush and a contrasting, opaque polish or acrylic paint to draw a few circle shapes. Spread them evenly on the the surface to make a nice composition. Then devide each circle in 'slices' and round of the two outer corners of each 'slice'.
Clean your brush (or use a new one) and use a third color to suround each circle shape with a line, leave a small gap between the circle and the line, if you can. Then fill in the gaps with the same color and let the whole nail dry for a few minutes.
The surface is still a bit bumpy, so to make it smoother and protect your design, apply a topcoat. At last clean up the excess polish on your skin and you've got yourself a fresh and juicy design ;)

Tip: To clean your nail art brush(es), pour a little bit of nail polish remover in a small dish or the lid of the bottle. Let your brush soak in it for a few seconds and dab it a few times on a cotton pad. Repeat this until your brush is clean.

I would absolutely love to see your attempt on my design, so feel free to leave a link to your creation in the comment section!

Products I used in this post are OPI The It Color, Essence Let's Get Lost and OPI Dim Sum Plum.

how to file perfect nails, filing perfectly shaped nails, filing square nails, filing oval nails, zumba nails, zumba dance design,

how to file perfectly shaped nails
 filing perfectly shaped nails

zumba nail art tutorial!

Wednesday 14 September 2011

Ancient Pattern Nail art

Hi guys, when I woke up this morning I'm very excited to make a mani using my new image plates.. Here's what I came up with..I used XL image plate "C" for my design. I named it "ANCIENT PATTERN" I really like the color I used in my NOTD. Usually, ancient designs are represented by dark shades, I made mine a brighter, and lighter one...

Here are the 3 nail polishes that I bought last week. The bottles are very cute! ♥
Materials used:
Some nail art that I forgot to post last week.. hehehe
BLUE CAMOUFLAGE
YIN YANG GRAFFITI
My youngest son turned 1 year and 10 months old yesterday! He's very cute right?!!
Hope you like them! God Bless you all!