Thursday 27 October 2011

Gameboy nails


Hi guys, guess my nails! I'm not even sure if you can say that. And the title might've been a big hint haha... but they're gameboy nails :D I made these for a reader who is going to dress up as gameboy for halloween, how cool is that? I thought it was such a fun theme and was beyond excited to work on them. My base color was Essence Got A Secret and I freehanded all the gameboy features with a tiny brush. For the glamorous index finger I used Orly It's Not Rocket Science, it's supposed to be the screen. The screen's kind of green, right? ;-) Anyway, hope you like them and goodnight everybody! :)

Other polishes I've used:
OPI - Dim Sum Plum
China Glaze - Concrete Catwalk

Monday 24 October 2011

retro cat nail, retro nail, cat nail, tuxedo nail, autumn leaf nail, halloween nails, halloween nail ideas, pinstriped tuxedo, gangsta nail, diva nail, HBIC nail, diva swagg, 3d gold glitter nail, holographic glitter nail,


Pyramid tips with Essie Fair Game

Eeek! Tipwear already...

Hi everyone! These pyramid chevron tips were made with Catrice Raspberry Fields Forever and Essie Fair Game. Both polishes are amazing to work with. Raspberry Fields Forever is a bright folly red, which has a pink hue that's much better visible in real life. It has the great formula and easy application that I'm used to from most of Catrice's creme polishes, I only used two coats and a layer of Seche Vite, shiny! Because Fair Game has that hint of blue that makes the polish so special, I thought it would look nice next to the pinkish Catrice. I just love the combination of pinks and blues, no matter how subtle ;-) I've never worn Fair Game as a full mani and question if I ever will, because as much as I like it, I just think it works better as an accent next to other colors. At least, on my skintone that is, I bet it would look gorgeous on people with a nice tan!

MONSTER PUMPKINS

Friday 21 October 2011

Cartoon hearts


Hi guys! Because you've all been so great to me, I wanted to show you some love with this cartoon heart mani ^^ I've received so many sweet messages since the start of this blog and they mean so much to me. I'm not good with words, nails are more my thing ;-) so this one's for you!
The hearts are freehanded and you can find a tutorial of the design here or at the tutorial tab above. On the rest of my nails I'm wearing one of the best glitters ever made: OPI's Mad As A Hatter. It has so many colors, love it! For a better view of the mad glitters, just enlarge the pictures by clicking on them.
Thanks for stopping by!

Wednesday 19 October 2011

The Mad Dollies nails


Hello guys! Today's post is another custom mani, I abosolutely love doing these! I got this request from a player from the Greensboro NC 
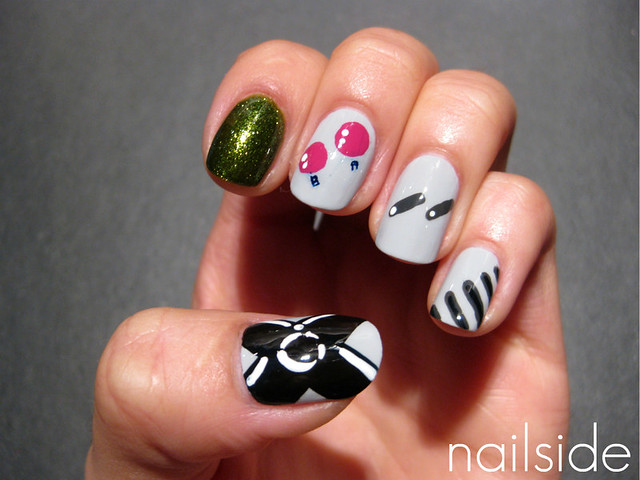
roller derby team The Mad Dollies. She asked if I could come up with some fierce nail art designs, in her team colors teal and yellow, that she could use for an upcoming game. She also loved the use of tape for nail art, so the first thing that came in mind was a fierce 
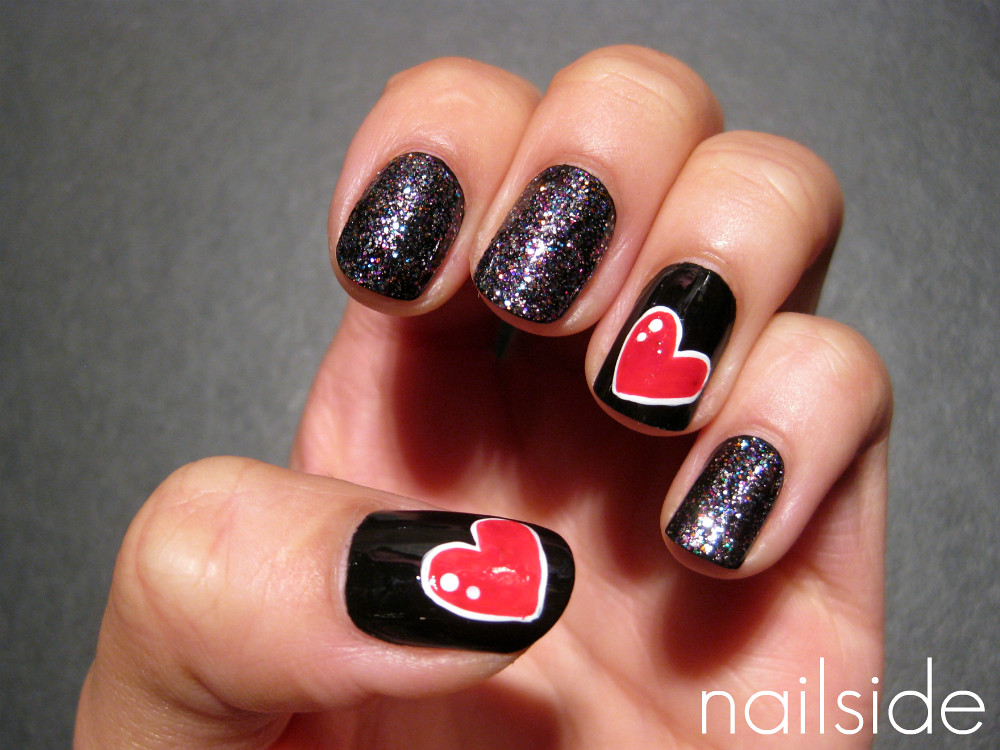
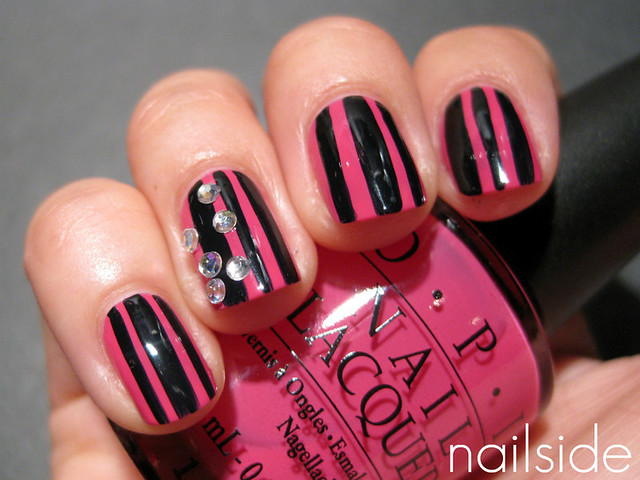
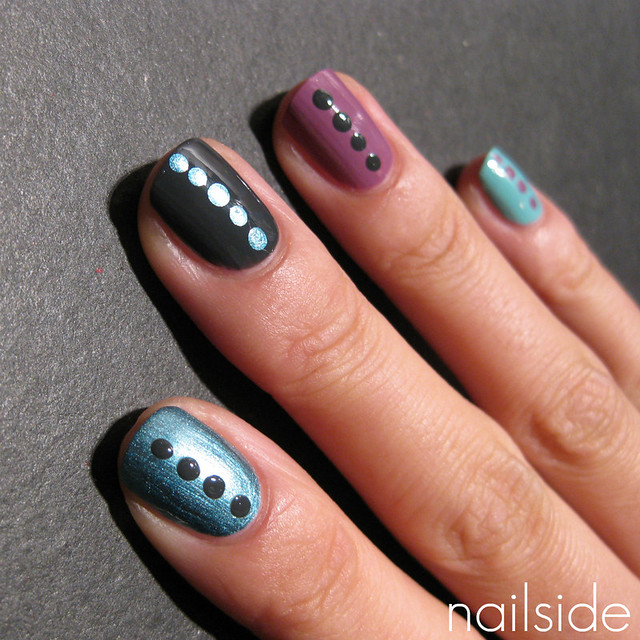
lightning bolt tape mani! ;-) (Which all went great until my topcoat decided to smudge my hard work!) On my thumb and pinky I have the symbols that two certain players carry on their helmet. I made the star using tape and I really like the design, but it took a lot of precision to get all the tape strips right. So I'm still thinking of a more efficient way to make the design in the future. And the index and middle finger resemble the distinctive tights I saw players on pictures wearing, mostly striped or fishnet. And luckily I had Konadplate M57 to make the last :)
So Kristin, I really hope you like these designs! You can use all five of them or just pick the ones you like best ;-) And good luck with the rest of this season!

I really enjoy working on these custom nails requests I'm getting lately, so if you would like me to make some designs for a special event or just for fun, feel free to leave your idea in the comments or send me an email at: nailside@gmail.com.

Polishes I used in this post:
Essence Stamp Me! White

Essence - Let's Get Lost
Color Club - Almost Famous
Color Club - Where's The Soiree?
China Glaze - Ink

Tuesday 18 October 2011

How to add a link to Robin Moses' blog to your blog! very cool

click here and learn how to add it in. its so easy!!!!!! thank you heather!!!!!!

Pink, black and bling


Hi everybody, today's post is something I made for a reader who'd requested a design for short nails. Two of her favorite colors were pink and black, so I made a simple stripe design with those colors. I love stripes, because they're never out of style in my opinion and also vertical stripes are a great way to make short nails seem a tad longer.
A stripe pattern with even-sized stripes is lovely, but it can be hard sometimes to make all the stripes exactly the same size. So I did a quick and easy-to-recreate pattern with random-sized stripes. The pink is OPI Don't Know Beets Me and for the stripes I used a China Glaze striper polish called Ink. (It's actually a very, very dark blue which looks pretty much black on the nails.) I just drew a few lines here and there, some bigger than others. And instead of actually drawing the stripes myself, I just let the whole length of the thin brush touch the surface while I pull it towards the tip, leaving pretty straight lines. So the brush does all the precise work for me ;-) Very easy and also nice with multiple colors, like I did here a couple of weeks ago. Just use pigmented polish for the job so you won't have to go over the same spot over and over again.
At last I added a few rhinestones for fun. I hope you like this, Maja! :)

Wearable Nail Soaker + NOTD

Hi guys!
I've been mia for a week! Yay sorry guys! I have a lot of nail art designs I want to post and share... but first , I have another review product from BORNPRETTY!
I'm very excited at first to try it because I was curious about the use of that particular nail art accessory.. Hehe
Anyway, I received 3 pcs of
Wearable Nail Soaker Art Acrylic Polish Remover tool.. For review purposes only.. But if you will buy them @ bornprettystore it's actually 10 pieces per set... It's a nail soaker.. I used them for removing my glittery nail polish. Most of us usually opt not to use glitter polish because it's very hard to remove on our nails. I think this product right here is the answer to that... It's very easy to use...

  • First, prepare the acetone nail soaker and cotton.
  • Remove the lid of the nail soaker, then insert your finger nails.
  • Place the cotton with acetone on your nails, then put the lid back on the soaker cup .
  • Soak for 2-3mins .
  • You will notice that it removes all the polish on nails much faster than the conventional way. It's very fun and easy...
  • I also used it for moisturizing my nails. I applied lotion and soak it for a minute.. I love the result..
TADA!!
NOTE: This product was sent to me as a gift. I made this review based on my own ideas and preference on how to use them. My opinions about the quality of the said products are based on my personal judgements and the outcome of my usage.

P.S Here are some of my recent nail art designs.. Hope you like them all! God bless

Sunday 16 October 2011

OPI DS - Extravagance


Hi everyone! For this post I'd like to show you OPI Extravagance from the Designer Series. Some of you might have seen it before here, a looong time ago, but I thought it deserved its own post :) Extravagance is my first and only DS polish so far, can you believe it! I own this pretty for a while now but for some reason I've haven't used it often. This weekend I decided to wear it on my nails again and I'm so glad I did because I fell in love for the second time... I'm amazed by the sparkly, holographic finish. The holo effect isn't as evident like the one in Gosh Holo, used here in a lightning bolt mani, but I don't care, it's so pretty anyway! I used two smooth coats to reach full opacity, no topcoat, look at it shining! What do you think about OPI Extravagance?

Friday 14 October 2011

420 videos (from the desk of the nail art wizard)

~*~*~*~*~*~*~and with 420 videos and halloween upon us, i celebrate. i will have others helping me man the ship while i am away. i will return shortly, revitalized and fresh and new!

on my youtube channel ALWAYS search through my "PLAYLISTS" for 100's of designs for all occasions. for beginners, intermediate and advanced artists, it will provide you with tons to learn and share! WILDLY share my name and post my videos wherever you can to help spread my nail art. please always say "inspired by" when copying any nail art. my designs are all copyrighted and protected and that is all ii ask for all i share. please show this to girls who cannot afford expensive nail art courses and need help. my love to you all and talk soon!!!

xxoxo
robin moses

P.S. also something i  find helpful. if you are looking for a design of mine but are having problems. google robin moses and whatever you are looking for.  for example: robin moses pirate, robin moses peacock, robin moses freddy, robin moses team jacob, etc. it will lead you quickly to many designs more quickly. i have been using this method to guide girls to certain ideas and slowly retagging my work to help bring up the correct tutorials that fit the quest.

nail art gallery, halloween nail gallery, black widow nail, spider nail, freddy krueger nail, freddy nail, halloween nail art, halloween nail art pictures, nail art tutorials, ghost nail, googly eye nail art, google eye nail art, cat nail, scared cat nail, cat on fence nail, halloween cat nail, jack o'lantern nail, pumpkin nail, halloween nail 2011

ENTIRE HALLOWEEN PLAYLIST 53 DIFFERENT HALLOWEEN DESIGNS TO CHOOSE FROM

(CLICK THE LINK ABOVE TO TAKE YOURSELF TO A TON OF DIFFERENT TYPES OF HALLOWEEN DESIGNS FROM MY HALLOWEEN PLAYLIST. FOR THOSE A LITTLE MORE GRUESOME STILL, GO TO MY DARK AND WEIRD PLAYLIST FOR MORE EXCLUSIVELY WEIRD NAIL ART TUTORIALS)


 FREDDY KRUEGER nails: robin moses halloween nail art design tutorial

 cute halloween ghost nails with googly eyes: robin moses nail art design tutorial

  Halloween Cat and full moon nails: robin moses nail art design tutorial

  halloween Jack O'lantern nails: robin moses nail art design tutorial

 halloween black widow spider nails: robin moses nail art design tutorial


Thursday 13 October 2011

Skittle and dots


Hello nail polish friends! Today I decided to practice some dotting. I envy those who can make perfect, even-sized dots, like the talented girls from Emerald Sparkled, Another Bottle Of Polish and Rebecca Likes Nails. Click on the links to see some amazing dotting manis they made, too gorgeous! My own attempt was very modest though, but definitely something I would wear again. I love the big impact of dots and how they can be achieved with little effort. The polishes I used:

China Glaze - For Audrey
China Glaze - Concrete Catwalk
China Glaze - Adore
Color Club - Uptown Girl

In case you're wondering, I used the same colors for my thumbs as the one on my pinkies ;) Thanks for reading!