gray and white floral (in floral playlist)
boogie shoes (in dark, strange and weird playlist)
foil and stars (found in cute playlist)
Monday, 4 July 2011
Innocent blue
Hello everyone! And happy Independence Day to the American ladies :)
Last night I posted pictures of H&M Coral Summer, which is also the base color for this look. Coral Summer was such a sweet and innocent blue that I wanted to complete that vibe with something cute. So I added a lace pattern along the tips, using Konad image plate M71. As you may notice, I don't do konads very often, it's because I'm bad at it and don't like the amount of clean-up of scraper, stamp and image plate in between haha. But I must say that it went pretty well this time, though I still have a lot of practicing to do before I reach the same perfection as the ladies from Emerald Sparkled or Oooh Shinies. The white polish did make the whole stamping process a lot more comfortable, it's Essence Stamp Me! White which I already had been using for regular polishing. It has a great opacity (one to two coats for full coverage) and a very affordable price: €1,49 for 5ml/0.16fl.oz., love!
So after this encouraging experience I might even attempt some more konading from now on :) Thank you for visiting!
Sunday, 3 July 2011
H&M - Coral Summer
Hey guys, guess what? H&M Pink Summer has a little brother! He's called Coral Summer and comes in an equally cute bottle. I'm not sure what coral has to do with the blue color and why it's spelled with double L on the bottle, but actually none of that matters because it's such a pretty polish. It's an innocent, slighty muted sky blue and like its sister it applied like a dream. I used two smooth coats for opacity and they both dried quickly. The day I bought this polish I was wearing China Glaze For Audrey, though they're certainly not dupes, For Audrey was surprisingly close to the bottle color. But it's a little bit lighter and greener than Coral Summer. So anyway, you should get Coral Summer, even for the awesome bottle alone. The formula is just perfect and it's not even expensive: €2.95 for 0.5 fl.oz./15ml. Good night :)
China Glaze - First Mate + Gosh - Rainbow
Hello dear readers and new followers! Since I'm still enjoying my 4th of July mani from yesterday, I'll be showing you some older pictures today. Pictured is China Glaze's First Mate layered with the beautiful Gosh Rainbow. It was part of the prizes that I won with my flowered tips entry for the Get Inspired nail art contest, hosted by Sofie from Swaafie. Rainbow had been on my wishlist for a while, and though Gosh is sold here in the Netherlands, I'd never seen Rainbow anywhere. But then I saw it could be won in Sofie's nail art contest! So I entered and the rest is history... Enough talking, picture time! Gosh, I love flakies...
And a bonus pic for the matt lovers like myself! ;)
Thanks for stopping by!
Saturday, 2 July 2011
4th of July nails
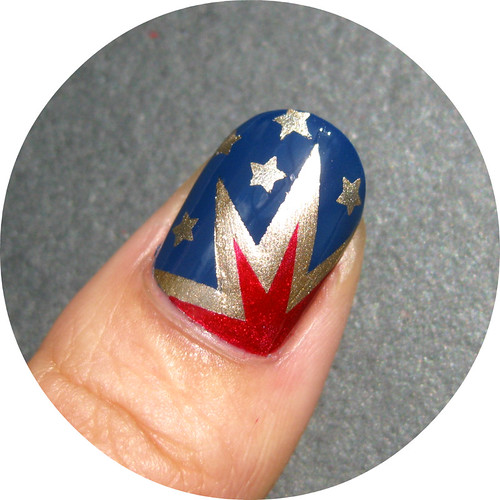
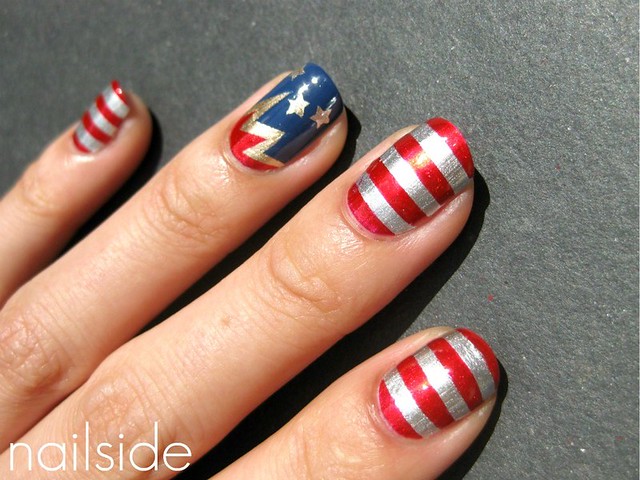
Hello everyone! For today's post I made 4th of July nails for my American readers. Holidays are always a fun theme for manis, so I was very excited to do some nail art for Independence Day, eventhough I do not celebrate it myself. The look is clearly inspired by the American flag, albeit with subtle changes, and tape was my #1 tool. I really couldn't have made the designs without it.
In total I used four different polishes: a red from Etos (Dutch drugstore), China Glaze's 2030 as my gold, First Mate as the blue base color and for the white stripes I used China Glaze Millenium, which is a silver. I picked a silver instead of a white because I thought it would pop more. But also because I didn't want the stripes to look too much like a candy cane or a Christmas elf ;) As mentioned earlier, tape was my magic helper in this little project. I used it to create both the stripes and big star shapes, which are supposed to be stylized fireworks, can you tell? ;)
To make the firework shapes I basically used the same technique as the one for the zigzag pattern, only I started at one corner of the tip, working my way back to the beginning of the nail (at the cuticles). So I started with the blue, then the gold on top and finally I applied the red. If you don't know what I'm talking about, just visit the tutorial for the zigzag pattern and hopefully it will all make sense then :)
Of course our flag wouldn't be complete without stars, so I added those afterwards with a (nameless) stamping plate from Essence.
In total I used four different polishes: a red from Etos (Dutch drugstore), China Glaze's 2030 as my gold, First Mate as the blue base color and for the white stripes I used China Glaze Millenium, which is a silver. I picked a silver instead of a white because I thought it would pop more. But also because I didn't want the stripes to look too much like a candy cane or a Christmas elf ;) As mentioned earlier, tape was my magic helper in this little project. I used it to create both the stripes and big star shapes, which are supposed to be stylized fireworks, can you tell? ;)
To make the firework shapes I basically used the same technique as the one for the zigzag pattern, only I started at one corner of the tip, working my way back to the beginning of the nail (at the cuticles). So I started with the blue, then the gold on top and finally I applied the red. If you don't know what I'm talking about, just visit the tutorial for the zigzag pattern and hopefully it will all make sense then :)
Of course our flag wouldn't be complete without stars, so I added those afterwards with a (nameless) stamping plate from Essence.
I hope you guys like my first 4th of July nails and that they may have even inspired you to make a cute mani for monday :) Thanks for reading!
Angry Birds Nails + Random Nailart
Hi guys,
How time flies, it's july again! Yay!
Season changes, so does my nails... I cut my nails short again, I missed doing stuff with my short nails, now I can.... I want to challenge myself to do nail art even if it is short..
I saw this kind of "tutOrial pix" on PHD I really like the way she shot the pictures, very detailed and well focused...


How time flies, it's july again! Yay!
Season changes, so does my nails... I cut my nails short again, I missed doing stuff with my short nails, now I can.... I want to challenge myself to do nail art even if it is short..
I thank you all guys for all your comments and for appreciating my work!
It's very heart warming when you see other people happy...☻
Anyway, here's my "Angry Bird" design.
I really like this game, actually I finished it and now i'm playing angry birds rio! hehehe... So addicted to it, a very fun game.. ☺
It's very heart warming when you see other people happy...☻
Anyway, here's my "Angry Bird" design.
I really like this game, actually I finished it and now i'm playing angry birds rio! hehehe... So addicted to it, a very fun game.. ☺
Zipper nails!
I saw this kind of "tutOrial pix" on PHD I really like the way she shot the pictures, very detailed and well focused...
Tooth nails!
I love it! My hubby requested for me to do this design.. Hehehe

P.S
Do not forget to join my APOTHICA giveaway! Thanks!
Friday, 1 July 2011
Color Club - Have A Bash
Hello everybody :) Though I'm not a huge crackle fan, I do like it. Especially since nowadays there are plenty more colors to choose from, other than black. I really like the blue crackles that OPI has released, but because I still find them kind of pricey, I chose for a cheaper alternative; Color Club Have A Bash. I don't have many other crackles to compare it with, in fact I only have one next to Have A Bash (Barry M Nail Effects in black), but so far I'm extremely satisfied with it. The crackle finish and drying time is similar to the Barry M's, only Have A Bash has a smoother formula.
In this mani I used Have A Bash on top of 3 coats OPI Don't Know... Beets Me! and me likey, because I heart blue and pink together ;)
Thanks for stopping by!
Subscribe to:
Posts (Atom)