Wednesday, 7 December 2011
violets nail, nail art violets, chanel le vernis, chanel mimosa, chanel LA sunrise, chanel yellow polish, tutorial, robinmosesnailart, robin moses violets
VIOLETS Yellow and Dark Blue Flowers: robin moses nail art design tutorial 455
with the "let it snow" project, i had NO IDEA how many would participate. i spent so long watching everyones videos and i admit, i cried like 3 times because i was so happy and there was so much beautiful art....but, i did get way behind in editing. i am neck-deep in christmas clients, tutorials, collaborations and life itself. so, today i post violets and a thank you to everyone who is sharing my name out and making this adventure so much fun :D my love to you guys!! happy wednesday!
let it snow (see the artists here!!) winter 2011
CLICK HERE TO SEE ALMOST 90 ARTISTS SHOW ART AND FRIENDSHIP!
here is a link to see all of the artists who participated in the "let it snow" nail, makeup and fine art project. if you are not in this line up and would like to be, please feel free to message me at youtube robinmosesnailart and i will be happy to add your LET IT SNOW video in. please have fun doing your art and know we will be doing this collaboration every year in celebration of sharing art and respecting each others strengths and differences while having fun and feeling comfortable in our environment. much love and thanks to all who DID participate, it was so so much fun and i am very honored at all of the wonderful response i have had personally with this project...i will never forget it.
love,
robin
here is a link to see all of the artists who participated in the "let it snow" nail, makeup and fine art project. if you are not in this line up and would like to be, please feel free to message me at youtube robinmosesnailart and i will be happy to add your LET IT SNOW video in. please have fun doing your art and know we will be doing this collaboration every year in celebration of sharing art and respecting each others strengths and differences while having fun and feeling comfortable in our environment. much love and thanks to all who DID participate, it was so so much fun and i am very honored at all of the wonderful response i have had personally with this project...i will never forget it.
love,
robin
Monday, 5 December 2011
Christmas nails with lace
Hi guys! These lacy nails were made recently when I was in a very Christmassy and girly mood, can you tell? ^^ I used OPI Big Apple Red and Konad imageplate M71 with Essence Stamp Me White!. This look is a lot girlier than I'm usually going for, but I enjoyed it nonetheless, squealing like a little child when I noticed how they matched red Christmas glasses from the Ikea was part of the fun haha :P
Thanks for stopping by!
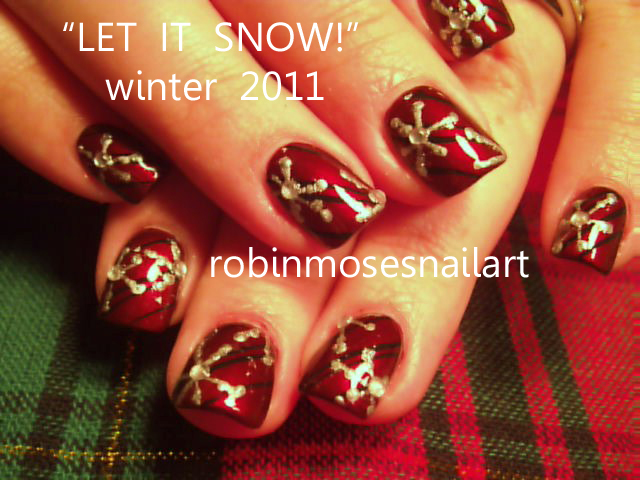
let it snow robin moses, snowflake nail, burgundy and silver nail, wine color nails, black and silver snowflakes, gothic christmas, retro christmas, nail art, retro nail, goth nail, ice blue nail, icey blue nail, let it snow collab, robinmosesnailart, let it snow, winter 2011, winter 2012, nail trends 2012, chic nails, classy christmas designs,
hello! so here are my 3 designs for "let it snow" day! this is an epic collaboration and if you have made a video to go along with it, just title it "let it snow" and add your video as a "video response" to all other tutorials named "let it snow" in celebration of art, makeup, beauty, nail art, and fine art......just art in general. please join in and make this a collaboration where we can all celebrate our differences and feel free to share and create something fun in a nice environment :)
Sunday, 4 December 2011
Saturday, 3 December 2011
Tutorial: Snowflake
Hello everybody, welcome to my snowflake tutorial! Snowflakes have such beautiful and delicate shapes that instantly make a cute winter mani. In this tutorial I'll show you how to make a detailed but fairly simple snowflake. All you need is a small nail art brush and two matching polishes, let's start!
Begin with your base color (if necessary with a basecoat underneath) and let it dry. Because the snowflake will be quite detailed, I'd recommend using a plain base color like a creme or subtle shimmer polish, to keep the focus on your design.
Use your nail art brush and a contrasting polish/acrylic paint to draw three lines that cross each other in the middle.Then add two small, slanted lines to each end of the lines you just drew. It's already starting to look like a snowflake now...
...but a little more detail will complete the design. So now add two bigger, slanted lines to just three of the six 'legs', alternating between each. The reason I'm suggesting to decorate only three of the six further, is because the nail simply isn't a very big canvas: if you'd add more of the slanted lines to every leg, the whole would look very tight.
Finally seal everything with a topcoat, clean up and you're done!
Use this design as a pattern on all nails or as an accent nail if you want to keep your mani simple.
Tip: Clean your nail art brush in between if you're using it for a long time. Because after a while polish will build up on it which can result in thick, goopy lines. Clean the brush by pouring a little bit of nail polish remover in a small dish (or the cap of the remover bottle), let your brush soak in it for a few seconds and dab it on a cotton pad a few times. Repeat this until your brush is clean.
I would absolutely love to see your attempt on this design, so feel free to leave a link to your creation in the comment section!
Polishes I used in this post are China Glaze First Mate and Essence Romeo (shimmer version).
Thursday, 1 December 2011
Snowflakes
Hi everyone :) Today I'd like to share these silver snowflakes with you. I was actually feeling pretty uninspired the whole day, sometimes you just have those days when you feel like you've got nothing to wear, even though you've got drawers of polish that could easily color the nails of your entire neighborhood... Anyone recognizes this? ;-) So to make a choice anyway, I just picked two bottles from my collection, with my eyes closed. Those polishes became L.A. Girl Matte Blue Twilight and Essence Romeo (the shimmer version), luckily they formed a great duo and they instantly said 'Snowflakes!'. I only had to apply one coat of Matte Blue Twilight, because it's very opaque and the formula is so smooth. (I'm gonna have to use this one more often!) And because it's matte, it dries quickly too, so soon after I could draw the snowflakes with a nail art brush and finally add top coat for a glossy finish. I'd already finished all my nails before I realized I should've taken pictures in between to make a tutorial. So I'll make new pictures once I've enjoyed this winter mani for a couple of days ^^ Hope you like it too and see you soon!
Subscribe to:
Posts (Atom)