Friday, 1 July 2011
Color Club - Have A Bash
Hello everybody :) Though I'm not a huge crackle fan, I do like it. Especially since nowadays there are plenty more colors to choose from, other than black. I really like the blue crackles that OPI has released, but because I still find them kind of pricey, I chose for a cheaper alternative; Color Club Have A Bash. I don't have many other crackles to compare it with, in fact I only have one next to Have A Bash (Barry M Nail Effects in black), but so far I'm extremely satisfied with it. The crackle finish and drying time is similar to the Barry M's, only Have A Bash has a smoother formula.
In this mani I used Have A Bash on top of 3 coats OPI Don't Know... Beets Me! and me likey, because I heart blue and pink together ;)
Thanks for stopping by!
Thursday, 30 June 2011
JOIN MY APOTHICA GIVEAWAY!!!
APOTHICA is giving away $25 worth of gift certificate to one of the followers of Art of Nail
APOTHICA is an online boutique that provides makeup, hair care, and many more beauty and skin care products.
They carry premium beauty brands such as Clinique, Too Faced, SkinMedica, DuWop, La Roche-Posay, etc.
Apothica have Master Estheticians available who are willing to help clients choose the right product for them.
Check out their site for more amazing products.
Here's how to join:
Mandatory Rule:
• Become a follower of my blog Art of Nail
And visit APOTHICA and tell me which item you prefer if ever you will win. (2entries)
Optional :
• Become a fan of Apothica on facebook (1entry)
• Follow Apothica on twitter (1entry)
• Mention this post on twitter (1entry)
• Sign up for their newsletter - found at the bottom of their page (3entries)
• Mention this post on your facebook (1entry)
• Mention this post on your blog (1entry)
• Total of 10 entries
Pls. Provide a link if you post , retweet, etc. So I can check it!
P.S the winner will be notified thru email. Don't forget to include your email address so that I can inform you if ever you win! Goodluck!
giveaway ends on : JULY 15, 2011 at 11:59 pm Philippine time.

Cool skittle
Then I used my favorite chunky glitter topper from Essence: Blaire! I love the different sizes of glitter and they're even prettier when they're mattified! Speaking of matt, I just bought a new matt topcoat from Claire's and I used this opportuntity to try it out (see last picture). But I think I'll stick to my #1 matt topcoat from Essence, the finish from the one from Claire's is more satin-like and that's just not matt enough for me ;)
4th of july nails, fourth of july nails, 4th of july nail art, 4th of july nail design, ice cream cone nails, skull nail art. 4th of july nail art, red white and blue nail art design, patriotic skulls, fun 4th nails, fourth of july mani,
i'm your ice cream man
patriotic skulls
Wednesday, 29 June 2011
pink and white swirls and pearls its barbie nail art design, PINK AND BLACK broken glass nail art. shattered glass nail art. bling bling diva nail art designs
exclusive diva design
working in portland this weekend and so i will be uploading my friday tutorials tomorrow (thursday) as there is no way around it. -- rushed but hopefully it will all turn out as right as rain. love and respect.
and ...my somewhat unexpected p-town work trip is throwing back my forum and my gallery art project back....hope to see a forum early next week. all is well ~~seeing explosions in the sky~~~~~ 9,10,11. exciting!
Sushi inspired nails
Tuesday, 28 June 2011
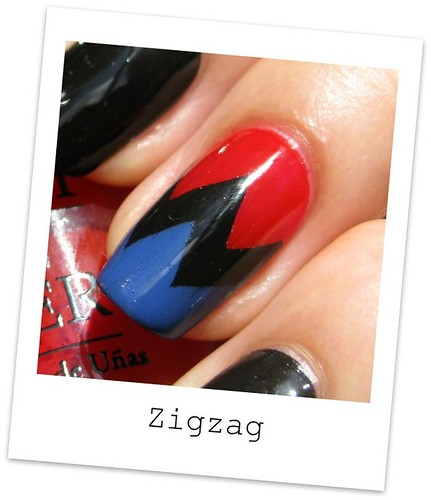
Tutorial: Zigzag pattern tape mani
Begin with the base color you like (if necessary with a basecoat underneath) and let it completely dry. You can apply a fresh color or use the current polish you're wearing (to practice). Since there will be two more coats of polish applied on top, it doesn't matter if there's a little bit of VNL or tipwear.Now cut some triangles out of tape to make the zigzag pattern. You'll need two pieces with each layering color. The reason why I use individual triangles is because seperate pieces of tape addapt better to the round surface of nails unlike one piece of tape with the whole zigzag cut out of it in one time, which also tears a lot more easily. (The same goes for the lightning bolt design.)
Place two triangles next to each other on about a third of the nail, with the points towards the tip. Make sure all the pieces of tape are completely stuck to the nail, if not use your finger or a tweezer to push them down and if needed reattach them.
Then apply your first layering color with a thin coat...
...and carefully peel off the pieces of tape right away. Let the design dry for a while and use a fast drying topcoat to shorten the drying process if needed.
Of course you can leave the design this way if you're starting to lose your patience by now, fanatics continue with step 5! :P
When the polish is entirely dry, repeat step 2, 3 and 4 with your second layering color, but now place the triangles a bit more towards the tip, covering up part of the first layering color like shown in the picture.
At last apply your topcoat, clean up and you're done! Don't forget to moisterize your cuticles afterwards, because when you've had tape on your skin so many times, it can get a bit dry!
Use the design for a full mani for eye-catching nails or cut it down to a few accent nails if you want to keep it simple or feel lazy ;)
- For my tape manis, all I use is regular stationery tape. But you might prefer something else, so just experiment with different sorts of tape to figure out what works best for you.
- For your base color you can use any polish you like, however one-coaters will allow you to place the tape much sooner because those are usually fast drying. Of course you can also quicken the drying of polishes that require several coats to cover, by applying a fast drying topcoat. (I use Seche Vite).
- Your layering color(s) can be either a one- or two-coater. Because you've already applied a base color, most polishes that usually take two coats to cover now will do with one.
- Though I mention cutting the tape strips as step 2, I admit it is safer to cut before applying the base color. However, if you've learned how to cut the tape without having it touch your polished nails, it can save you a lot of time.
- You might want to leave the cut strips somewhere else than the edge of your desk/table, to prevent them from getting stuck to the surface while you're busy. You do not want to have to peel them off with your freshly painted claws!
- Apply your top color in one thin (but opaque) coat, this will create crisper lines.
- When you're removing the tape strips, try to remove them individually, if you can, because most of the time your design will come out neater this way
- Using tweezers to remove the tape strips can prevent your freshly painted nails from getting smudged.
- It's not always necessary to start all over if you've messed up your design, often a little touch-up with a nailart brush can solve the problem.
- If you want to use a matt topcoat, use a regular one underneath. My experience with matt topcoats is that they smudge the design very easily, even when it's completely dry. Applying a normal topcoat first will prevent that.
- Moisterize your cuticles afterwards, because the tape can really dry out your skin!
- You can practice this tutorial on your old mani that you applied a day (or more) before. If you succeed, you've got yourself a fresh mani, otherwise you were going to remove it anyway!
- If you feel like this design is too time-consuming for a full mani, you can also use it for an accent nail (or two).
- Have fun and practice makes perfect ;)
Polishes I used in this post are OPI Big Apple Red, Color Club Where's The Soiree? and Essence Chuck.